


If you want to learn a bit about how to set up a simple static web page hosted on your own private server, then this tutorial will walk you through the steps of configuring a Digital Ocean Droplet with Nginx to do just that.
Pre-requisites
If you don't already have a Digital Ocean account you can set one up with my referral link to get $100 free credits.
You'll need a few things if you want to follow this tutorial through fully:
- A DigitalOcean Droplet setup and ready to use with SSH (a server from any other provider should work just fine too)
- Your Droplet's IP address
- At least a bit of knowledge of using the Terminal / Command Line
- (Ideally) already have an existing domain name or purchase one (See below)
If you get stuck with anything just drop a comment below or Tweet me @codebubb with the problem you're having.
Buy a domain & configure DNS
The first step is to create a new domain name.
Note: You can host a site without a domain however you won't be able to install an SSL and you'll be relying on the IP address to point users to. If you're just testing this process out you can skip this and the SSL step and just use your Droplet's IP.
I'm not advocating any specific domain name registrar - you may have one that you normally use already - but I use NameCheap.com for a lot of my domain registrations.
When you've purchased your domain, you need to point it (by means of updating it's DNS records) to your Digital Ocean Droplet.
Here's how this looks in the NameCheap control panel:
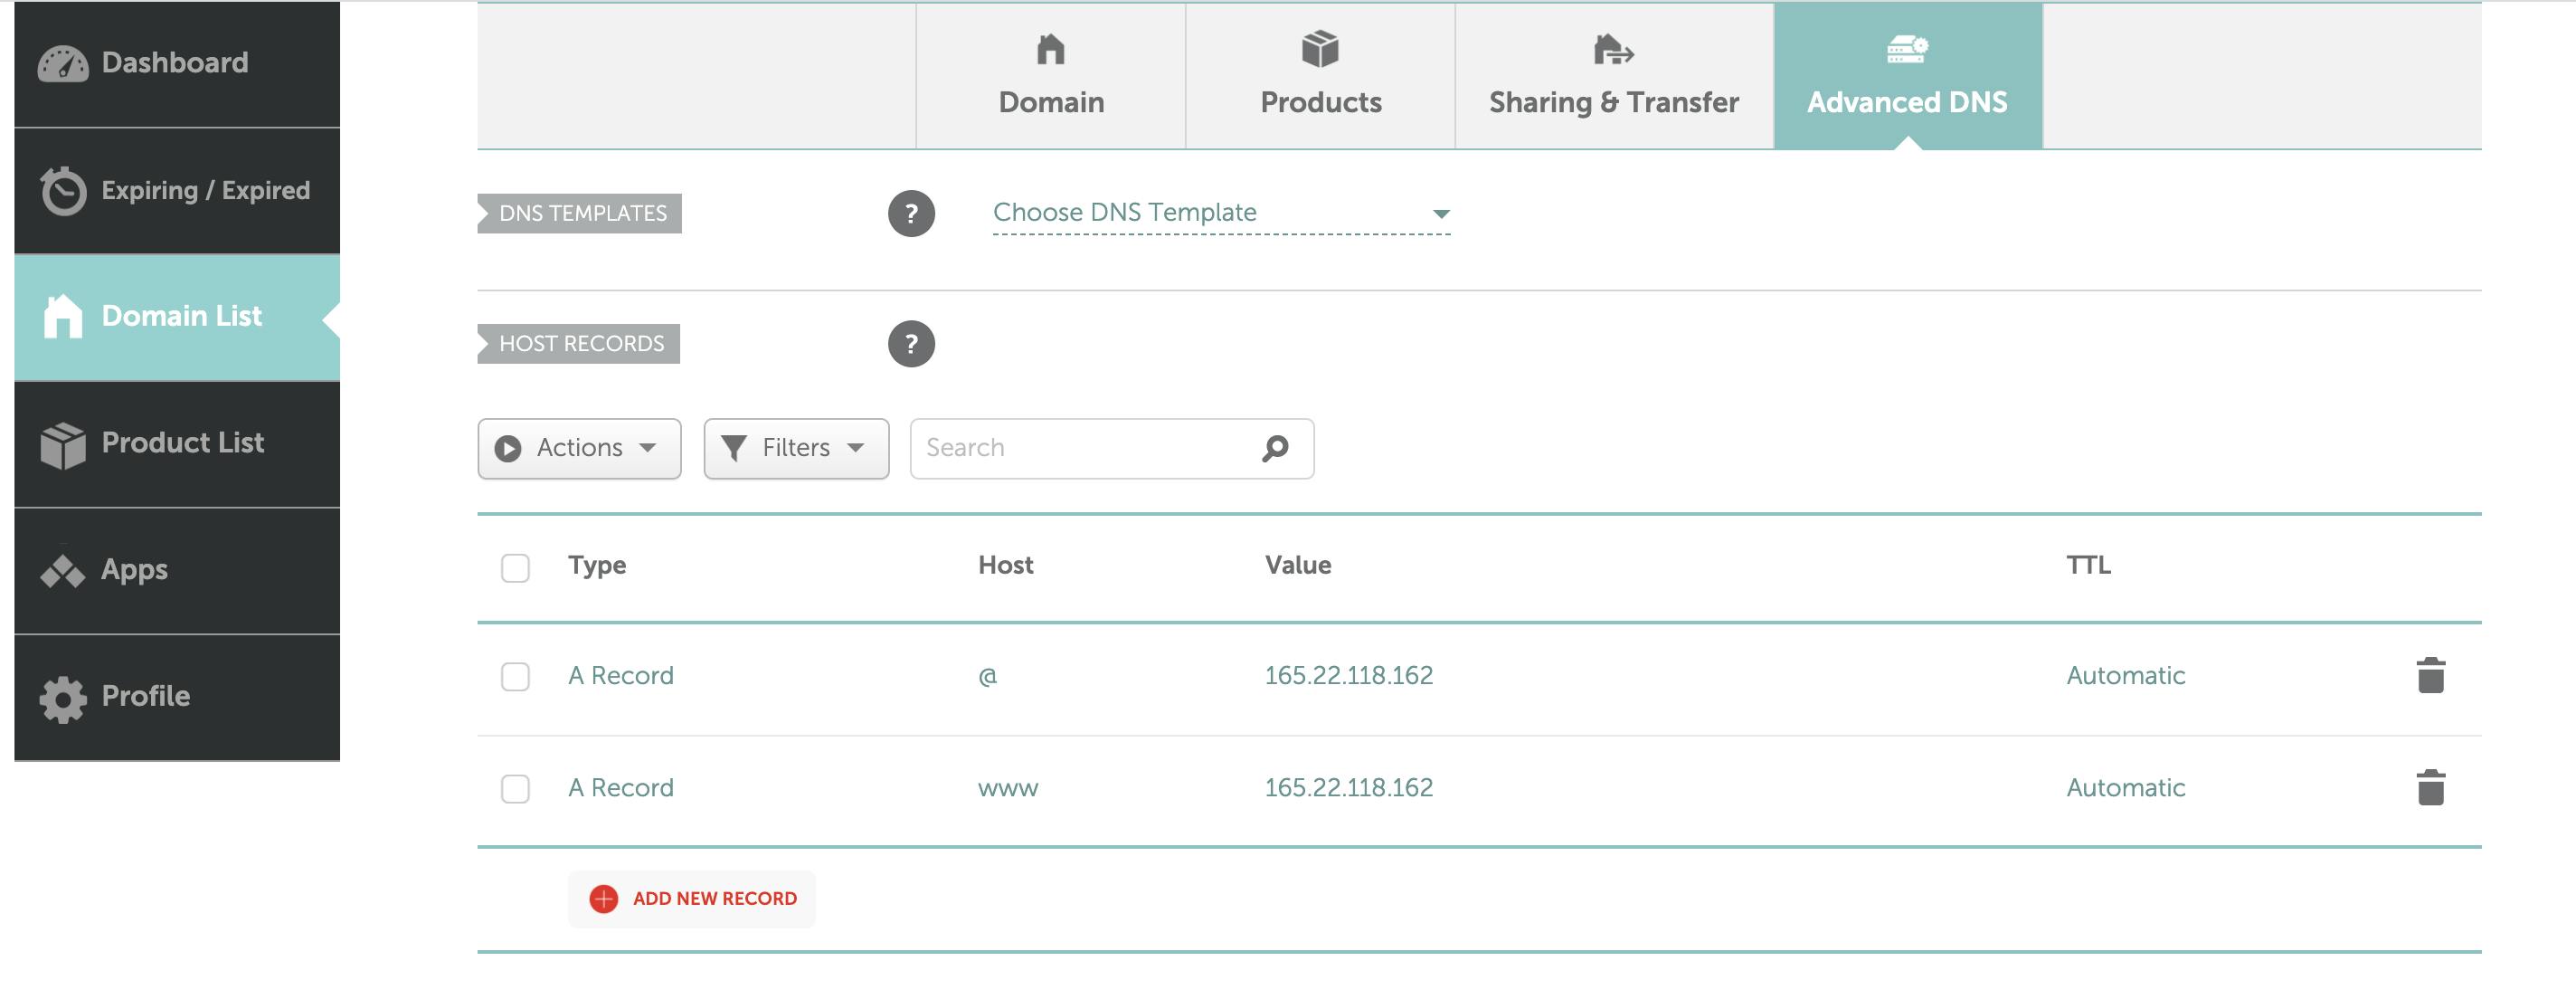
You can see you need to point your domain's A Record to your Droplet's IP address. With NameCheap this is achieved by creating two records one for the @ record (the domain without any prefix e.g. example.com) and one for the www record.
If you're not sure about this config, ask your domain registar for help (drop me a message on Twitter @codebubb if you need help with NameCheap setup).
Install Nginx on your Droplet
With your domain name pointing at your Droplet, we need to configure a web server. In this example, we're going to be using Nginx.
To do this, log in to your Droplet via SSH and run the install for Nginx:
ssh user@<domain or droplet IP>
sudo apt update
sudo apt install nginx
You may need to adjust your firewall on your Droplet depending on how you have configured it. You can check if Nginx traffic is allowed by running:
sudo ufw status
Which should show Nginx is allowed through the firewall:
Status: active

To                         Action      From
--                         ------      ----
Nginx Full                 ALLOW       Anywhere
22/tcp                     ALLOW       Anywhere
Nginx Full (v6)            ALLOW       Anywhere (v6)
22/tcp (v6)                ALLOW       Anywhere (v6)
Create a directory for website files
Let's now create a directory and a placeholder web page for our site.
mkdir /var/www/html/mysite.com
touch /var/www/html/mysite.com/index.html
Obviously replacing the mysite.com name with the domain that you have purchased.
Note: Depending on the configuration of your Droplet you may need to prefix the above commands with sudo and we should really ensure the permissions of the public HTML folders are set correctly but for simplicity's sake, we'll cover that in another article.
You can add some content for the placeholder index page using an editor such as nano:
nano /var/www/html/mysite.com/index.html
We'll add a simple h1 tag:
<h1>Welcome to mysite!</h1>
Create the Nginx config
Next, we'll setup a configuration for the site within Nginx so that our Droplet can handle requests for our domain.
You can either make a copy of the default configuration found in /etc/nginx/sites-available or create a new file. The file should have the same name as the domain you are using.
The contents of the file should look like this:
server {
    root /var/www/html/mysite.com;

    index index.html index.htm index.nginx-debian.html;
        server_name mysite.com

    location / {
        try_files $uri $uri/ =404;
    }
You'll need to replace mysite.com with the domain you are using.
Enable the site within Nginx
We've created the site but Nginx won't serve the site yet as it needs to be enabled.
To do this, we add a reference to the site configuration we just created in the/etc/nginx/sites-enabled folder. We do this by adding a symlink:
sudo ln -s /etc/nginx/sites-available/mysite.com /etc/nginx/sites-enabled/
We're now ready to test our configuration and start serving our site.
Test the configuration and restart Nginx
To test the configuration file we've just created run:
sudo nginx -t
If you get a successful message then we just need to restart Nginx to apply the new changes.
sudo service nginx restart
All being well, if you now browse to your site, you should see the index page that we configured a few steps ago. (If you get any errors, again Tweet me the problem you're having).

Success!
Uploading files to the site
So this is the tricky part only because there are plenty of different ways to upload files to your Droplet with Digital Ocean.
Ideally, you would want some kind of build pipeline to continuously integrate changes into your live site but for this tutorial we're going to keep it simple and transfer our project files to the Droplet via scp.
scp involves transferring your files from you local computer to your Droplet over an SSH connection.
To do this, navigate to the folder on your local computer where your ready to deploy project is. Then run this command to upload the files to the folder we created on the Droplet:
scp -R * user@<domain or droplet IP>:/var/www/html/mysite.com
If you then browse to your site again, you should see your completed project appearing.
Next steps
As mentioned in the previous step, one of the next things you should do is look into creating a CI/CD process to manage the update of the site. Also, it would probably be a good idea to secure your site with an SSL certificate to allow secure connections.
Thanks for reading!
Be sure to let me know your thoughts or any problems you have on Twitter @codebubb.